Packages and Utilities
A group under the Control Panel that has tools that help in the handling of Blackboard data. Tool from this section help to delete, copy, back up and check for link availability. For more information about what each tool does, please click the links below.
The tools in this group are :
Usually bulk delete is used at the end of the course. It allows you to delete specific areas and content(e.g Announcements,Students…) from the course and the rest of it as it is for future use.
Warning: Consider backing up your course to be on the safe side, because bulk delete permanently delete the content you select.
In order to use Bulk Delete:
- On the Control Panel , click the Packages and Utilities and then Bulk Delete.
- In the Select Content Material to Delete section, you select material for deletion by checking the box on the left. You can select multiple material to delete or even all of them.
- In the Select Other Materials to Delete section, you select material for deletion according to area. For example if you select Users. All users in this course will be deleted.
- In the Confirmation section, you must type Delete exactly as it is shown. This section exist to make sure you don’t delete content by mistake.
- After you are done, click Submit.

- Copy Course Materials into a New Course: When you use this option, new course is created and the material you have selected are copied into this new course.
- Copy Course Materials into an Existing Course:Using this option will copy the material of a course to another, but will not replace any existing material.
- Copy Course with Users (Exact Copy): Using this option to copy everything from a course to another in order to make an exact copy. This is the only option that allows you to copy user records such as grade and everything associated with them.
In the Destination Course ID field, you must type the course name that will be created. Make sure the course name is unique and contain only numbers,characters, underscores and periods.All other symbols are not acceptable.
After you select the course name , you have to select which contents will be copied. Note that you must select either contacts,content or settings for the operation to complete.
In the Enrollments section only click Include Enrollments in the Copy if you want to enroll the students to the new course that you created. This option is usually left unchecked.
Finally, click Submit.

The Export/Archive Course feature create a package in the form of zip that contains course content and tool of one course that can be use in other courses. In order for the package to work properly you must not modify or un-zip it, because it will not be imported correctly.
In order to archive a course:
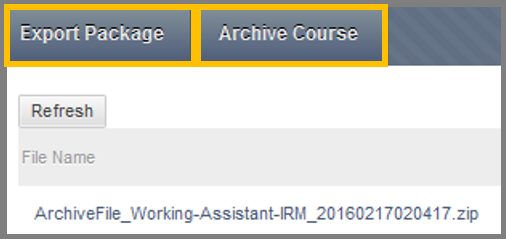
- On the Control Panel click the Packages and Utilities and then Export/Archive Course.
- Click Archive Course.
- In the Select Copy Options field the course that you are currently in should be selected
Click Include Grade Center History if you want to include all the data from Grade center .
In the File attachments section:
- Click Calculate Size to see the size of all the course content that you want to copy in MB. The maximum size of your package is 1 GB.
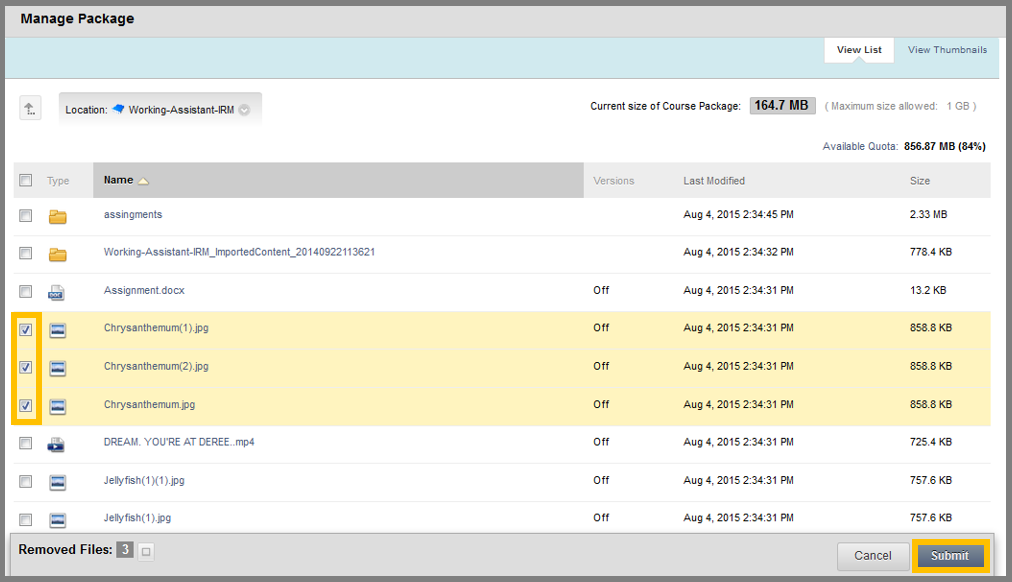
- Click Manage Package Size to manage the contents that will be added in the package. A window will open with all the items that will be included in the package. Here you can select which files to remove from this package in order to reduce its size.
- Click Submit.
Finally, click Submit.
The Export Package is another option you can use. Using this option allows you to create a compressed file, containing only the content that you want. This file can be downloaded and stored for later use, in the same or another course.
In order to create a Package:
- On the Control Panel click the Packages and Utilities and then Export/Archive Course.
- Click Export Package.
- In the Select Copy Options field, the course that you are currently in should be selected.
- In the File attachments section:
- Click Calculate Size to see the size of all the course content that you want to copy in MB. The maximum size of your package is 1 GB.
- Click Manage Package Size to manage the contents that will be added in the package. A window will open with all the items that will be included in the package. Here you can select which files to remove from this package in order to reduce its size.
- Click Submit.
- In the Course Files Default Directory select if you want to include shortcuts or the actual files into the package.
- In the Select Course Material section, select the content you want to include to your package.
- Press Submit.
You can also use the Export Common Cartridge Package option to create a package for your course by following the steps below:
- On the Control Panel click the Packages and Utilities and then Export/Archive Course.
- Click Export Common Cartridge Package.
- In the Select Common Cartridge Version section, leave the second option selected. (1.1)
- In the Select Content Area section, select if you want to export one content area or the whole course.
- Check the option below if you want to use the name of the selected content area as the cartridge’s name, instead of the course’s name.
- Press Submit.
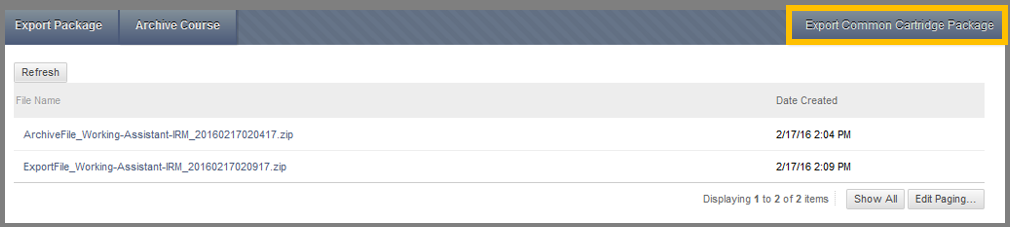
After a few minutes, click the Refresh button to see the .zip file that will be created.
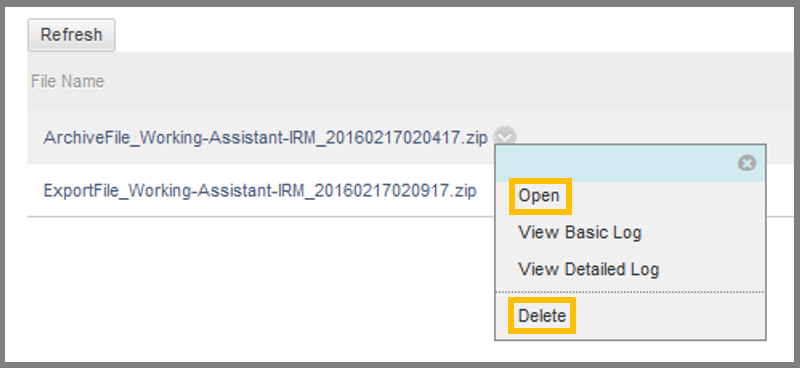
To download it, simply click the contextual menu and select Open. A window will pop-up asking you where you want to save your file.
You can also delete it by pressing the Delete button.
You can import this file into a course, by using the Import Package tool, described below.
Course Cartridges are premade material made by professionals that can be downloaded and added to the course.They usually offer complete sets of teaching tools that instructor can use to enhance their blackboard course.When the material are downloaded to the blackboard they can be freely customized and modified by the instructor to correctly cover the needs of the course.
There are two kinds of Cartridges:
- Copy-protected: Only one copy-protected cartridge can be included in a course and you cannot include it when you export the course.
- Open access: There is no limit as to how many cartridges can be added to a given course and these type of cartridges can be included when you import a course.
To import a course cartridge:
- First you need to obtain the instructor download key from the textbook publisher.
- Then put the key in the Enter a Course Cartridge Download Key area.
- Click Submit.

To Import the content of your Archive or Exported course into another container you need to click the Import Package / View Logs option under the Packages and Utilities on the Control Panel of the destination container.
Click the Import Package button and the Import Package page shows up.

Here, you select the Archive or Exported file you wish to import by clicking the Browse My Computer button and choosing the file.
After that, check the materials you want to import (i.e. Content Areas, Announcements and Settings) and click Submit.

Wait for a few moments and refresh your container’s page to see the imported material added. Note that the material does not replace but it is added in the existing contents of the container.
Notice: Never upload an Exported Course package that has been edited since it was created and downloaded. Opening the .ZIP file and changing any of the files in the Exported Course package will result in unstable and unpredictable behavior when the Course is imported.
LTI links are links to external applications (such as virtual science experiments and interactive demos). These application links can be added to any content area through the web link option and can also be added as a menu item on the left. To add an LTI link as a menu item, click Add Menu Item, then Web Link and then write the corresponding LTI link.
In the Manage LTI Links tool , you can modify the LTI link you have already added.
The modifications you can perform are :
- Make Unavailable: Click this to make this link unavailable.
- Delete: Click to delete the link.