Journals
A Journal is self-reflective tool for students. Only the student and the Instructor are able to Comment on Journal Entries. However, Journals can be made Public by the Instructor so all enrolled users can read all entries made to the Journal topic. Group Journal entries can be read by all Group members and the Instructor.
To create a new Journal:
- Navigate to Control Panel > Course Tools > Journals and then click the “Create Journal” button.
- Provide a name for the Journal and optional instructions.
- In the Journal Availability field, select Yes if you want this Journal available to students.
- In the Journal Date and Time Restrictions field, select how long you want the Journal to be available.
- In the Journal Settings field, select the permissions you want the users of this Journal to have.
- In the Grade Settings field, provide a grade, if you want to grade this Journal.

To create a new Journal Entry:
- While on the Journal Page select a Journal title.
- Then click Create Journal Entry.
- While in the Create Journal Entry page, type a title and an entry message.
- In the Journal Entry Files field, select the file/s you want to upload. You can select Browse My Computer to upload files directly from your computer or you can select Browse Course to select a file that has already been uploaded to the course.
- In the Submit field, click Post Entry.

You can also modify a journal from the contextual menu.
This menu had three options:
- Edit: Transfers you to the Edit Journal Entry page, where you can modify the Journal’s properties.
- Keep as New: Mark the journal as new.
- Delete: Deletes the selected journal.
To edit a Journal entry:
- Make sure the Edit mode is ON.
- From the contextual menu of a journal click the Edit option.
- While on the Edit journal page, make the changes you want.
- Click Submit.
To delete a Journal entry:
- Make sure the Edit mode is ON.
- From the contextual menu of a journal click the Delete option.
To comment on a Journal entry:
- While on the Journal page.
- Find the Journal entry you want to reply to and click the Comment button.
- A Comment field will appear, enabling you to submit an answer.
- After you have finished writing your answer, click Submit.
To grade Journal entries:
- While on the Journal page.
- Find the Journal entry you want to Grade.
- Select the user’s name on the side panel, in the More Journals section.
- While in the Journal Grade section, click Edit Grade.
- Type a grade in the Current Grade value box.
- Optionally type feedback for the student.
- Click Save Grade.
View and modify Drafts
- In the creation of a Journal Entry you have the option to Save Entry as Draft.
- This option instead of publishing the journal entry, it saves it for later use.
- To access a Draft, navigate to the Journal page and click the View Drafts button.
- While inside the Drafts page, you can see all journal entries that you saved as drafts and modify them or publish them.
- In order to access a draft, click on it.
- While inside you can modify it and save it again as a draft by clicking the Save Entry as Draft button or publish it by clicking Post Entry.
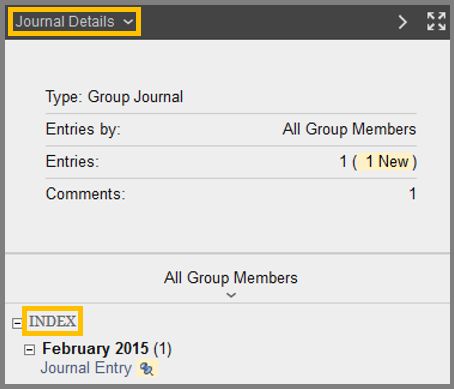
View Journal Information and Details
- The information about the journal can be found on the right page of your screen.
- If you click the Journal Details, you can reveal details about your journal. These details are:
- Type: Type of the journal. (Individual or Group)
- Entries by: Who can create entries.
- Entries: The number of entries in this journal.
- Comments: The number of comments.
- Below you can see the Grade of this journal entry and the existing journals.
- If you want to hide this menu, you can click the arrow button (>) at the top-right.
- If you want to display the Journal page in fullscreen, simply press the fullscreen button at the top-right of the screen.