Groups
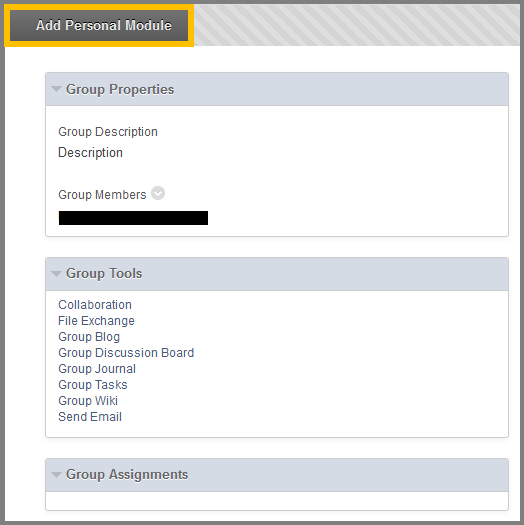
Groups is basically a subset of users that are enrolled in a course. Each group of users has its own workspace, where the member of the group can perform action privately of other students.
You can create groups of students to collaborate on academic work and you can do so, by creating them one at a time or in sets. Each groups has access to each own homepage and to various tools and links that help students collaborate.
To find Groups follow the directions below:
- While inside your course.
- Navigate to Course Management > Users and Groups > Groups.
- Click the group you want to enter.
Below there is the description of each group’s available tools:
- Collaboration – Create and attend chat sessions and virtual classroom sessions.
- File Exchange – All members, as well as your instructor, can add files. They can also delete files, regardless of who added them.
- Group Discussion Board -Users within the group can create and manage their own forums and discuss topics with just the group members.
- Group Blog -All course members can, read and comment on a group blog, but they cannot make posts unless they are members of the group. Your instructor can select the grade option for group blogs.
- Group Journal – All members of a group can view each group member entries, but the group journal can only be viewed by the group and your instructor.
- Group Task – Users within the group can create tasks that are distributed to all group members.
- Group Wiki – Users within the group can edit, and view their group wiki. Your instructor can view and edit a group wiki.
- Send Email – Users within the group can email the other members or the entire group.
How to email a group:
- Access the group you want and click the Send Email option.
- While inside the Send Email page, select the recipients of the email in the Available to Select box.
- Type a Subject for your email.
- Type a Message for your email.
- Click Attach a File if you want to include a file in your email.
- Click Submit.
How to exchange files within a group:
- Access the group you want and click the File Exchange option.
- While inside the page, click Add File.
- While on the Add File page click the Browse My Computer to upload a file from your computer.
- Click Submit.
There are two group creation Options:
- Create a Single Group
- Create a Group Set
Group Enrollments Methods
- Self-Enroll: Students will be able to enroll themselves in a group, by adding their names to a sign-up sheet. Sign-up sheets can be made available on the Groups page and can limit the number of people allowed to join the group.
- Manual Enroll: Create a standard group of students to collaborate on work and add manually the students in the group.
- Random Enroll: Available for Group sets only and automatically distributes membership to the groups based on a designated number of students per group or the number of groups.
- Navigate from the Course menu to Course Management > Users and Groups > Groups.
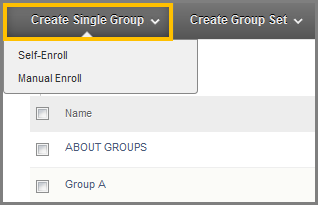
- While inside the Group page, select from the Create Single Group tab, either Self-Enroll or Manual Enroll.
For Self-Enroll:
- On the Create Group page, type a Name and an optional Description.
- Select Yes if you want to make the Group available.
- In the Tool Availability section, select what tools you want to be available in your group and which one of those you choose to grade.
- In the Module Personalization Setting section, check if you want your students to be able to change the group page module.
- In the Sign-up option section, type the name of the sign-up sheet, the instructions and the maximum number of students that can enroll into this group.
- Click Submit.
For Manual Enroll:
- On the Create Group page, type a Name and an optional Description.
- Select Yes if you want to make the Group available.
- In the Tool Availability section, select what tools you want to be available in your group and which one of those you choose to grade.
- In the Module Personalization Setting section, check if you want your students to be able to change the group page module.
- In the Membership field, select the student you want to enroll in this group.
- Click Submit.
Create a Group Set:
- Navigate from the Course menu to Course Management > Users and Groups > Groups.
- While inside the Group page, select from the Create Single Group tab, either Self-Enroll or Manual Enroll.
For Self-Enroll:
- On the Create Group page, type a Name and an optional Description.
- Select Yes if you want to make the Group available.
- In the Tool Availability section, select what tools you want to be available in your group and which one of those you choose to grade.
- In the Module Personalization Setting section, check if you want your students to be able to change the group page module.
- In the Sign-up option section, type the name of the sign-up sheet, the instructions and the maximum number of students that can enroll into this group.
- In the Group Set Options field select a number of groups.
- Click Submit.
For Manual Enroll:
- On the Create Group page, type a Name and an optional Description.
- Select Yes if you want to make the Group available.
- In the Tool Availability section, select what tools you want to be available in your group and which one of those you choose to grade.
- In the Module Personalization Setting section, check if you want your students to be able to change the group page module.
- In the Membership field, select the student you want to enroll in this group.
- In the Group Set Options field select a number of groups.
- Click Submit.
For Random Enroll:
- On the Create Group page, type a Name and an optional Description.
- Select Yes if you want to make the Group available.
- In the Tool Availability section, select what tools you want to be available in your group and which one of those you choose to grade.
- In the Module Personalization Setting section, check if you want your students to be able to change the group page module.
- Type the Number of Students per Group to create or the Number of Groups. Select an option to Determine How to Enroll any Remaining Members in the groups.
Import a Group:
- While inside the Groups page, click the Import button to get redirected to the Import Group page.
- Click Browse my Computer, to select the appropriate .csv file that contain the Group information.
- Select in the Tool Availability, what information you want to make available in the group that will be created by the imported file.

