Grade Center
The Grade Center can record data, monitor student progress and communicate information to students, instructors and administrators. It is also a valuable tool for assisting decision making on taking action to promote student and institutional progress.

To access the Grade Center
- Visit the Control Panel.
- Go to the Grade Center area and click double arrow.

- Visit the Action Bar.
The following menu options are displayed in the toolbar of the Grade Center page:
Create Column – An icon used to create a Grade Column in the Grade Center.
To create a column in the Grade Center, follow these steps
- Click “Create Column” in the Action Bar of the Grade Center.
- Type a Column Name. This is a formal name for the column. This field will only accept 15 characters.

- Enter a Grade Center Display Name. This appears as the column header in the Grade Center. This field will also accept 15 characters.
- Type a Description. A description will help Instructors and other graders to identify the column.
- Select a Primary Display option from the drop-down menu. The default choice is Score.
- Select a Secondary Display from the drop-down menu. This selection displays the secondary format for this Grade Item in the Grade Center.
Tip: Simply entering a Score for Grade Column that uses the Primary Display of Percentage will not calculate the Percentage. To calculate a Score’s Percentage select Score from the Primary Display drop-down menu and then choose Percentage from the Secondary Display drop-down menu.
- Select a Category from the drop-down menu. This associates the column to a Category. The default choice is No Category.
Note: Default Categories are included in the Grade Center. User defined Categories must first be created before they can be associated with a column.
- Enter Points Possible. Denote the number of points assigned to this column. Non numeric entries are not accepted.
- Date Created. This system-added field displays the date the Grade Item was created and cannot be edited.

- Enter a Due Date. Select from the following:
- None – there will be no due date for the Grade Item.
- Specify the due date for the Grade Item, including month, day, and year.
- Set additional Options for the column by selecting the Yes or No radio button for the following:
- Include this Column in Grade Center Calculations – the column is included in the possible selections of items when creating Calculated Columns, such as Weighted Grades Columns or Total Point Columns.
- Show this Column to Students – Grades will appear in My Grades, View Grades, and the Report Card module when available.
- Show Statistics (average and median) for this column in My Grades – Includes statistical information with the grade value when shown to students.
- Click Submit to save.
Add a Calculated Column– a contextual menu with options for creating Calculated Columns appears.
Weighted Grade Columns: Calculated Columns that display the result of quantities and their respective percentages. It is also displayed as a normal column in the Grade center.
To create a Weighted Column in the Grade Center, follow these steps

- Click Create Calculated Column in the Action Bar of the Grade Center.
- Click Weighted Column from the contextual menu.
- Type a Column Name. This is a formal name for the column. This field will only accept 15 characters.
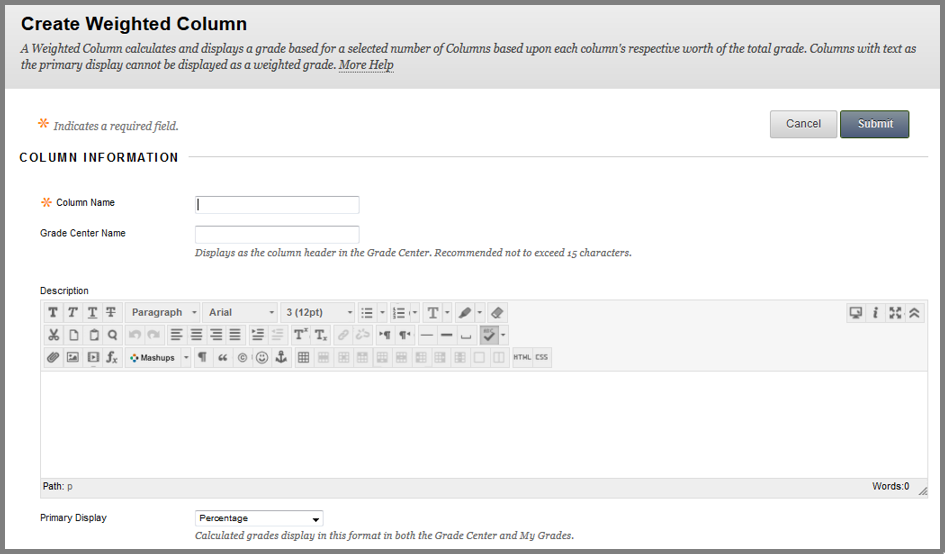
- Enter a Grade Center Display Name. This appears as the column header in the Grade Center. This field will also accept 15 characters.
- Type a Description. A description will help Instructors and other graders to identify the column.
- Select a Primary Display option from the drop-down menu. The default choice is Percentage.
- Select a Secondary Display from the drop-down menu. This selection displays the secondary format for this Grade Item in the Grade Center.
- Date Created. This system-added field displays the date the Grade Item was created and cannot be edited.
- Select the items to be included in the Weighted Grade Column, and enter the percentages for each column or Category to be included in the Weighted Grade.
- Columns to Select – A list of all columns in the Grade Center. Select the Column and click the arrow to add it to the Weighted Grade column.
- Categories to Select – A list of all Categories in the Grade Center. Select the appropriate category and click the arrow to add it to the Weighted Grade column. After all columns and Categories have been selected, enter the percentage for each selection.

Tip: To remove a selected Grade Item or Category from consideration, click the red “x“.
- Calculate as a running total – Select Yes to calculate the weight as a running total so as to include only the Columns that have been graded. Select No to include all items.
The following selections can be made to share column information with users:
- Include Column in Grade Center calculations – Makes the column available for use in other calculations.
- Show this Column to Students – Shows the column in My Grades.
- Show Statistics (average and median) for this column to Students in My Grades.
Edit a column
- While in the Grade Center page, click the contextual menu of the column you want to delete.
- A window with open with various option. To edit the column, click Edit Column Information.
- You will be redirected to the Edit Column page that is identical to the Create Column page.
- Change the fields and information that you want to edit.
- Click Submit.
Remove a column
- While in the Grade Center page, click the contextual menu of the column you want to delete.
- A window with open with various option. To remove the column, click Delete Column.
- After clicking Delete Column, a warning window will open. Click OK to proceed with the deletion of the column.s

Managing my Grade Center
Manage – Displays the Grade Center management options when the action link is triggered. Selections include options for:

- Grading Periods user-defined segments within the Grade Center that can be defined as Terms, Semesters, Quarters, Years, and so on. (*)Grading Periods are used to sort Grade Center Columns into sections based on due date.
- Grading Schemas map scored gradable items into a user-facing display (This is grading students with letters i.e. A,B,C,D,F). (*)Grading Schemas take the actual points scored from a Grade Item and compare it to the total points possible for that item to derive a percentage. This percentage is mapped to a range of scores in order to display a grade.
- Grading Color Codes (*) Grading Color Codes apply background and text color to items in the grade center that meet specified criteria. Colors can be defined for items that have an In Progress, Needs Grading, or Exempt status. Grade Ranges can be defined by percentage and background and text colors applied to items that fall within the defined grading percentages.
- Categories classifications of Columns of gradable items such as “Test” or “Assignment”.
- Smart Views custom made views of Grade Center data created by Instructors and saved for continued use.
- Column Organization page is divided into various tables that control how different Grade Center views are displayed.
- Row Visibility rows can be hidden from the Grade Center View to reduce the number of rows in the grid.
- Send E-mail – Displays the E-mail options when the action link is triggered.
Reports – Displays a page from which Reports for the Course are created. 
- Create Report – Generate reports for the students or the class.
- Grade History – Displays a page where the Grade History of any selected students is displayed.
- Student Receipts – Each submission of a student receives a confirmation number that is unique in order to verify that it has been receipt.