Files
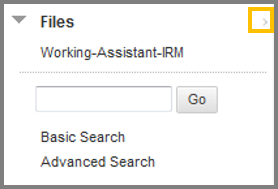
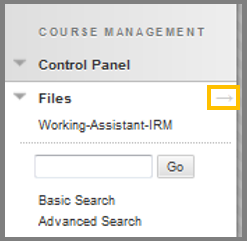
To access Course Files, navigate to Course Management > Files and the press the arrow.
The Files area, in the Course Managment contains a search function that let you search for files and folders in the course.
There are 3 ways to search using this function.
- Just type in what you want to search and press Go.
- Basic Search
In the Basic Search page you can search a file or folder name using two search options from the drop-down list.The first one, Contains searches for content that contain your input in its name and the second one, Equals searches for content that have exactly the same same as your input.
You can also click the Search File Contents to search.
3. Advanced Search
The first section of the Advanced Search is the same as the Basic Search.
In the Additional Search Options you can include in your search many more options.
- Search From: You can search from a specific location and not the whole course content.
- Size: Search for content according to their size in bytes.
- Username: Search for content created from a specific user.
- Date: Search for content according to the date that they were edited or created.
In the Alignment section you can search for course content using the goal that they are aligned with.
Warning: Do not upload a file more than once. Each file you upload is save in the Course files and therefore to use it more than one you can create a link/shortcut to it, instead of re-uploading it.
Also the total size of all the files stored in a course container cannot exceed 1 Gigabyte.
Course Files
While inside the Course files , you can view and edit all the files that are stored in your course.
You can download, copy, delete or move them.
To access the area where the files are stored:
- Click the contextual menu button.
- You will be redirected to the Files page, where you will see all the files that are stored inside the course container.
How to Upload Files:
- Navigate to the Upload drop down tab and click Upload Files.
- In the Upload page you have two option on how to upload a file, which are Single file upload Multiple file upload.
- Select which one you want depending on the number of files you want to upload.
How to perform Single file upload:
- While in the Upload page.
- Select the Single File tab, at the top-right corner.
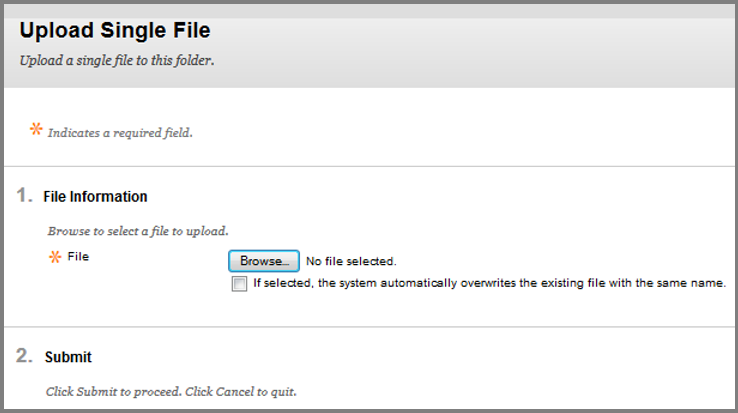
- While in the Upload Single File page.
- Click Browse to upload the file you want from your computer.
- Optionally, check the check-box below, if you want to overwrite a possible file with the same name.
- Click Submit.
How to perform a Package upload:
- Navigate to the Upload drop down tab and click Upload Package.
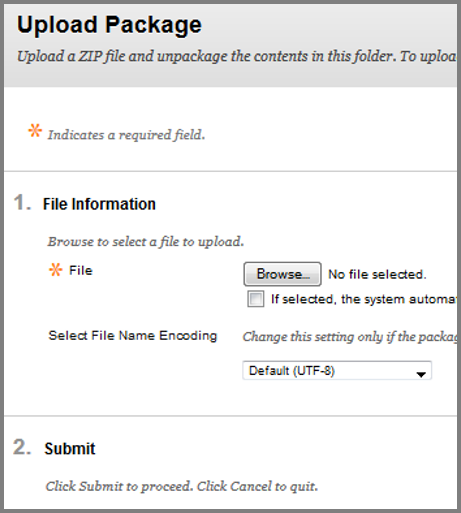
- While in the Upload Package page.
- Click Browse and select the ZIP file that you want to upload. (Please note that by uploading a ZIP file as a package all its contents will be extracted in this folder.)
- Optionally, check the check-box below, if you want to overwrite a possible file with the same name.
- In the File Name Encoding drop-down menu select the Default option.
- Click Submit.
To manage permissions for those files:
- While inside the Files page.
- Click the Permissions link that exist at the right of every file.
- You will be redirected to the Permissions page, where you can assign permissions to users or group of users.
- To add permissions click the Add Course User List button to access the Add Course User List page.
- Select the Roles that you want to add permissions to from the Roles field.
- Then Set Permissions to those Roles from the Set Permissions field.
- Check the Overwrite check-box, if you want to remove the current permissions and grand the permissions selected in this page.
- Click Submit.
- You can also delete permissions by selecting the check box on the User/User List and clicking Delete.
To delete files:
- While in the Files page.
- Check the files you want to delete.
- Click the Delete button, to permanently delete those files.


